Toyota Camry (XV70): Removal
REMOVAL
CAUTION / NOTICE / HINT
NOTICE:
- Immediately after installing the brake pads, the braking performance may be reduced. Always perform a road test in a safe place while paying attention to the surroundings.
- After replacing the front disc brake pads, always perform a road test to check the braking performance and check for vibrations.
HINT:
- Use the same procedure for the RH side and LH side.
- The following procedure is for the LH side.
PROCEDURE
1. REMOVE FRONT WHEEL
Click here

2. DRAIN BRAKE FLUID
NOTICE:
If brake fluid leaks onto any painted surface, immediately wash it off.
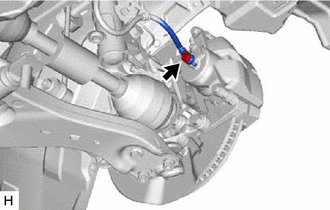
3. DISCONNECT FRONT FLEXIBLE HOSE
| (a) Remove the union bolt and gasket, and disconnect the front flexible hose from the front disc brake cylinder assembly. |
|
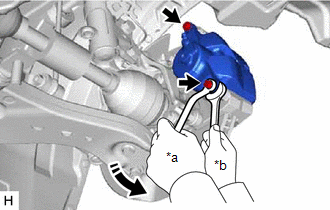
4. REMOVE FRONT DISC BRAKE CYLINDER ASSEMBLY
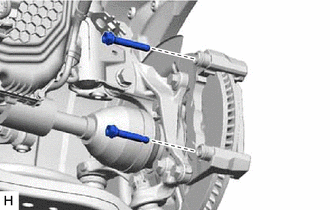
| (a) Hold the 2 front disc brake cylinder slide pins and remove the 2 bolts and front disc brake cylinder assembly. |
|
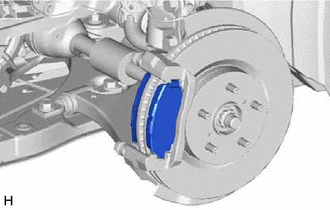
5. REMOVE FRONT DISC BRAKE PAD
| (a) Remove the 2 front disc brake pads from the front disc brake cylinder mounting. |
|
6. REMOVE FRONT DISC BRAKE ANTI-SQUEAL SHIM KIT
Click here
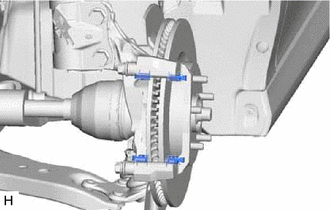
7. REMOVE FRONT DISC BRAKE PAD SUPPORT PLATE
| (a) Remove the 4 front disc brake pad support plates from the front disc brake cylinder mounting. NOTICE: Each front disc brake pad support plate has a different shape. Be sure to put an identification mark on each front disc brake pad support plate so that it can be reinstalled to its original position. |
|
8. REMOVE FRONT DISC BRAKE CYLINDER SLIDE PIN
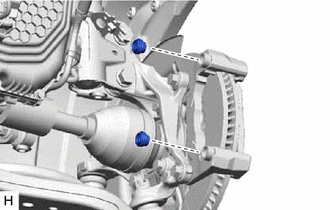
| (a) Remove the 2 front disc brake cylinder slide pins from the front disc brake cylinder mounting. |
|
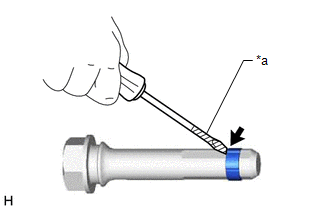
| (b) Using a screwdriver with its tip wrapped with protective tape, remove the front disc brake cylinder slide bushing from the front disc brake cylinder slide pin (lower side). NOTICE: Do not damage the front disc brake cylinder slide pin. |
|
9. REMOVE FRONT DISC BRAKE BUSHING DUST BOOT
| (a) Remove the 2 front disc brake bushing dust boots from the front disc brake cylinder mounting. |
|
10. REMOVE FRONT DISC BRAKE CYLINDER MOUNTING
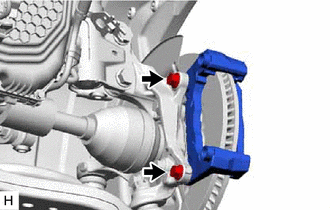
| (a) Remove the 2 bolts and front disc brake cylinder mounting from the steering knuckle. |
|
11. REMOVE FRONT DISC
|
(a) Put matchmarks on the front disc and the front axle hub sub-assembly. |
|
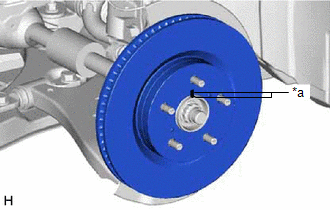
(b) Remove the front disc.
READ NEXT:
 Disassembly
DISASSEMBLY PROCEDURE 1. REMOVE FRONT DISC BRAKE PISTON
(a) Place a piece of cloth between the front disc brake piston and front disc brake cylinder.
*a Cloth
Inspection
INSPECTION PROCEDURE 1. INSPECT BRAKE CYLINDER AND PISTON
(a) Check the front disc brake cylinder bore and front disc brake piston for rust and scoring. If necessary, replace the front disc brake cy
Reassembly
REASSEMBLY CAUTION / NOTICE / HINT PROCEDURE
1. TEMPORARILY TIGHTEN FRONT DISC BRAKE BLEEDER PLUG (a) Temporarily install the front disc brake bleeder plug to the front disc brake cylinder.
HINT:
SEE MORE:
Left Rear Wheel Speed Sensor Signal Stuck High (C050C24)
DESCRIPTION Refer to DTC C050C12 Click here
DTC No. Detection Item
DTC Detection Condition Trouble Area
C050C24 Left Rear Wheel Speed Sensor Signal Stuck High
The speed sensor signal is not within the specified range for 5 seconds or more.
Rear speed sen
Components
COMPONENTS ILLUSTRATION
*1 REAR CENTER SEAT OUTER BELT ASSEMBLY
*2 REAR SEAT CUSHION ASSEMBLY
*3 REAR SEAT CUSHION LOCK HOOK
*4 REAR SEAT INNER BELT ASSEMBLY RH
*5 WASHER
- -
Tightening torque for "Major areas involving basic veh
