Toyota Camry (XV70): Components
COMPONENTS
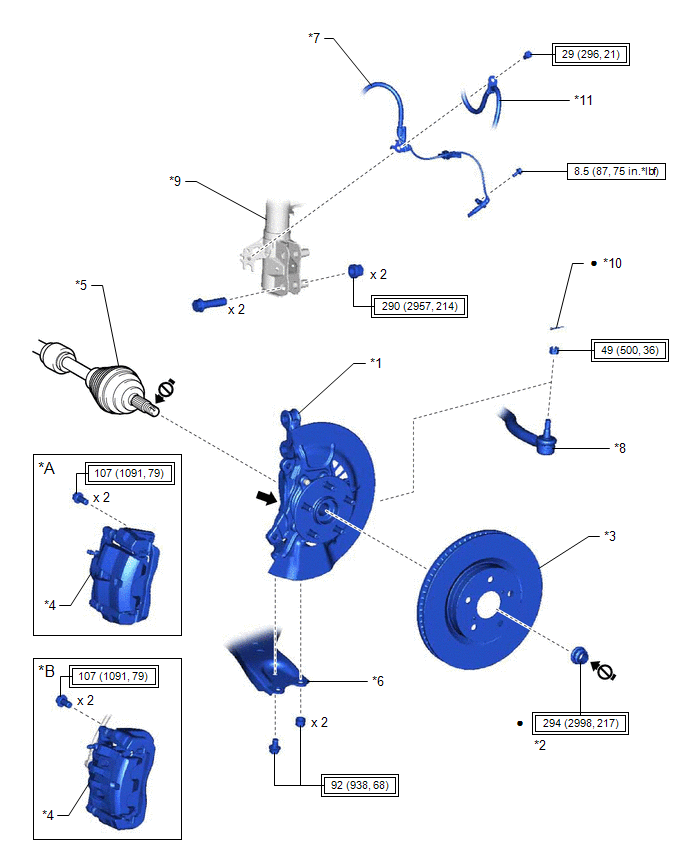
ILLUSTRATION
|
*A | except 2-Pod Caliper |
*B | for 2-Pod Caliper |
|
*1 | FRONT AXLE ASSEMBLY |
*2 | FRONT AXLE SHAFT NUT |
|
*3 | FRONT DISC |
*4 | FRONT DISC BRAKE CALIPER ASSEMBLY |
|
*5 | FRONT DRIVE SHAFT ASSEMBLY |
*6 | FRONT LOWER NO. 1 SUSPENSION ARM SUB-ASSEMBLY |
|
*7 | FRONT SPEED SENSOR |
*8 | TIE ROD ASSEMBLY |
|
*9 | FRONT SHOCK ABSORBER ASSEMBLY |
*10 | COTTER PIN |
|
*11 | FRONT FLEXIBLE HOSE |
- | - |
 |
Tightening torque for "Major areas involving basic vehicle performance such as moving/turning/stopping" : N*m (kgf*cm, ft.*lbf) |
.png) |
N*m (kgf*cm, ft.*lbf): Specified torque |
|
● | Non-reusable part |
.png) |
Toyota Body Grease W |
 |
Do not apply lubricants to the threaded parts |
- | - |
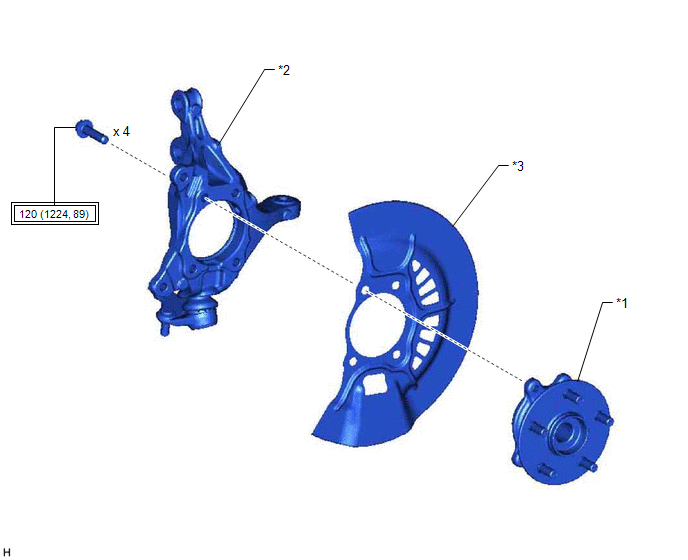
ILLUSTRATION
|
*1 | FRONT AXLE HUB SUB-ASSEMBLY |
*2 | STEERING KNUCKLE |
|
*3 | FRONT DISC BRAKE DUST COVER |
- | - |
|
|
Tightening torque for "Major areas involving basic vehicle performance such as moving/turning/stopping" : N*m (kgf*cm, ft.*lbf) |
- | - |
READ NEXT:
 On-vehicle Inspection
ON-VEHICLE INSPECTION CAUTION / NOTICE / HINT
HINT:
Use the same procedure for the RH side and LH side.
The following procedure is for the LH side.
PROCEDURE 1. REMOVE FRONT WHEEL Click
Removal
REMOVAL CAUTION / NOTICE / HINT
The necessary procedures (adjustment, calibration, initialization, or registration) that must be performed after parts are removed and installed, or replaced during f
Installation
INSTALLATION CAUTION / NOTICE / HINT
HINT:
Use the same procedure for the RH side and LH side.
The following procedure is for the LH side.
PROCEDURE 1. INSTALL FRONT AXLE HUB SUB-ASSEMBL
SEE MORE:
Installation
INSTALLATION PROCEDURE 1. SET NO. 1 CYLINDER TO TDC (COMPRESSION)
(a) Confirm that the timing mark (cutout) on the crankshaft pulley is aligned with the "0" timing mark of the timing chain cover assembly.
*a Timing Mark (Cutout)
*b "0" Timing Mark
Installation
INSTALLATION PROCEDURE 1. INSTALL ROOF ANTENNA ASSEMBLY (except Panoramic Moon Roof)
(a) When reusing the roof antenna assembly: (1) Install a new seal.
(b) Push the roof antenna assembly in the direction indicated by the arrow (1) shown in the illustration to engage the guide.
