Toyota Camry (XV70): 2gr-fks Air Cleaner Filter Element
Components
COMPONENTS
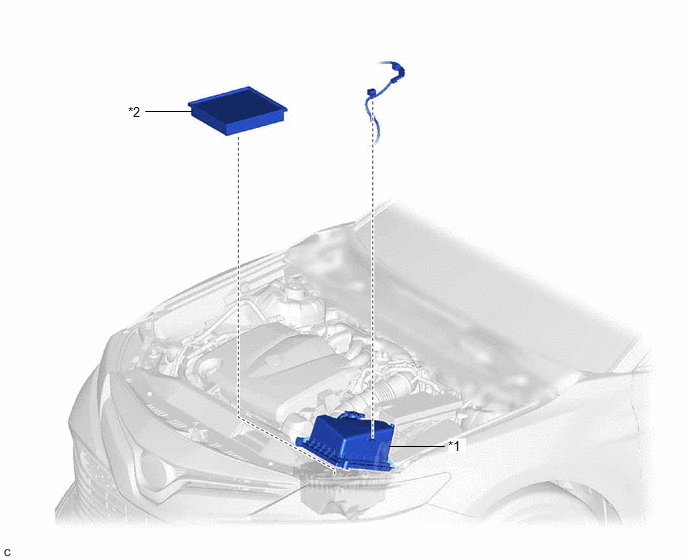
ILLUSTRATION
|
*1 | AIR CLEANER CAP SUB-ASSEMBLY |
*2 | AIR CLEANER FILTER ELEMENT SUB-ASSEMBLY |
Removal
REMOVAL
PROCEDURE
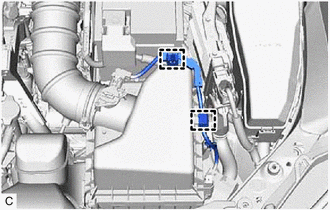
1. SEPARATE AIR CLEANER CAP SUB-ASSEMBLY
| (a) Disengage the 2 wire harness clamps. |
|
| (b) Disengage the 2 air cleaner cap clamps. |
|
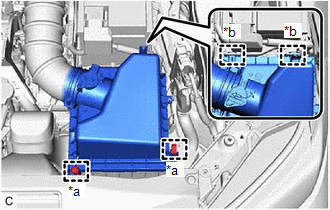
(c) Disengage the 2 guides to separate the air cleaner cap sub-assembly from the air cleaner case sub-assembly.
2. REMOVE AIR CLEANER FILTER ELEMENT SUB-ASSEMBLY
| (a) Remove the air cleaner filter element sub-assembly from the air cleaner case sub-assembly. NOTICE: Do not allow foreign matter to enter the air cleaner cap sub-assembly and air cleaner case sub-assembly. |
|

3. INSPECT AIR CLEANER FILTER ELEMENT SUB-ASSEMBLY
HINT:
This procedure is only performed when the air cleaner filter element sub-assembly will be reused.
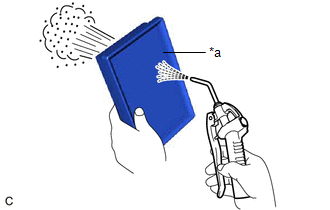
(a) Check whether the air cleaner filter element sub-assembly is dirty or clogged.
| (b) If the air cleaner filter element sub-assembly is dirty or has foreign matter adhered to it, clean the air cleaner filter element sub-assembly with compressed air. NOTICE: When cleaning the air cleaner filter element sub-assembly, blow the compressed air from the intake downstream side (from the air cleaner cap sub-assembly side). HINT: If the air cleaner filter element sub-assembly is still extremely dirty after cleaning it, replace the air cleaner filter element sub-assembly with a new one. |
|
Installation
INSTALLATION
PROCEDURE
1. INSTALL AIR CLEANER FILTER ELEMENT SUB-ASSEMBLY
(a) Check that the inside of the air cleaner case sub-assembly does not have dirt or deposits, and clean them away if they are present.
(b) Install the air cleaner filter element sub-assembly to the air cleaner case sub-assembly.
2. INSTALL AIR CLEANER CAP SUB-ASSEMBLY
(a) Engage the 2 guides to install the air cleaner cap sub-assembly to the air cleaner case sub-assembly.
(b) Engage the 2 air cleaner cap clamps.
(c) Engage the 2 wire harness clamps.
READ NEXT:
 Components
COMPONENTS ILLUSTRATION
*1 BATTERY
*2 NEGATIVE BATTERY TERMINAL
*3 POSITIVE BATTERY TERMINAL
*4 NO. 2 BATTERY CLAMP
*5 BATTERY TERMINAL CAP
- -
Removal
REMOVAL CAUTION / NOTICE / HINT
The necessary procedures (adjustment, calibration, initialization or registration) that must be performed after parts are removed and installed, or replaced battery r
SEE MORE:
Reverse Signal Circuit
DESCRIPTION The radio and display receiver assembly receives a reverse signal from the BKUP LP relay. WIRING DIAGRAM
PROCEDURE
1.
CHECK BACK-UP LIGHT (a) Move the shift lever to R and check if the back-up lights come on.
OK: The back-up lights come on.
NG
GO TO LIGHTIN
Right Front Wheel Speed Sensor Supply Voltage Circuit Short to Ground or Open (C14E314)
DESCRIPTION Refer to DTC C050612 Click here
DTC No. Detection Item
DTC Detection Condition Trouble Area
C14E314 Right Front Wheel Speed Sensor Supply Voltage Circuit Short to Ground or Open
An open or short in the speed sensor power supply circuit is detected for 0
