Toyota Camry (XV70): Removal
REMOVAL
CAUTION / NOTICE / HINT
The necessary procedures (adjustment, calibration, initialization, or registration) that must be performed after parts are removed and installed, or replaced during rear stereo component speaker assembly removal/installation are shown below.
Necessary Procedure After Parts Removed/Installed/Replaced|
Replaced Part or Performed Procedure |
Necessary Procedures | Effect/Inoperative Function when Necessary Procedure not Performed |
Link |
|---|---|---|---|
| Disconnect cable from negative battery terminal |
Perform steering sensor zero point calibration |
Lane Tracing Assist System |
|
|
Pre-collision System | |||
|
Memorize steering angle neutral point |
Parking Assist Monitor System |
| |
|
Panoramic View Monitor System |
|
CAUTION:
Some of these service operations affect the SRS airbag system. Read the precautionary notices concerning the SRS airbag system before servicing.
Click here .gif)
.png)
PROCEDURE
1. PRECAUTION
NOTICE:
After turning the ignition switch off, waiting time may be required before disconnecting the cable from the negative (-) battery terminal. Therefore, make sure to read the disconnecting the cable from the negative (-) battery terminal notices before proceeding with work.
Click here
2. DISCONNECT CABLE FROM NEGATIVE BATTERY TERMINAL
for A25A-FKS:
Click here
for 2GR-FKS:
Click here
CAUTION:
- Wait at least 90 seconds after disconnecting the cable from the negative (-) battery terminal to disable the SRS system.
- If an airbag deploys for any reason, it may cause a serious injury.
.png)
3. REMOVE REAR SEAT CUSHION ASSEMBLY
Click here
4. REMOVE REAR SEAT CUSHION LOCK HOOK
Click here
5. DISCONNECT REAR DOOR OPENING TRIM WEATHERSTRIP LH
Click here
6. REMOVE REAR SIDE SEATBACK ASSEMBLY LH
Click here
7. DISCONNECT REAR DOOR OPENING TRIM WEATHERSTRIP RH
HINT:
Use the same procedure as for the LH side.
8. REMOVE REAR SIDE SEATBACK ASSEMBLY RH
HINT:
Use the same procedure as for the LH side.
9. REMOVE INNER ROOF SIDE GARNISH LH
Click here
10. REMOVE INNER ROOF SIDE GARNISH RH
HINT:
Use the same procedure as for the LH side.
11. DISCONNECT REAR SEAT OUTER BELT ASSEMBLY LH
Click here
12. DISCONNECT REAR SEAT OUTER BELT ASSEMBLY RH
HINT:
Use the same procedure as for the LH side.
13. REMOVE CENTER STOP LIGHT SET
Click here
14. REMOVE REAR SEAT SHOULDER BELT HOLE COVER
Click here
15. REMOVE PACKAGE TRAY TRIM PANEL ASSEMBLY
Click here
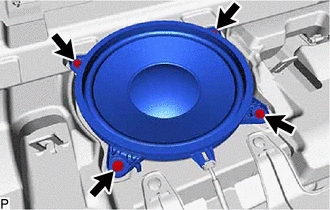
16. REMOVE REAR STEREO COMPONENT SPEAKER ASSEMBLY
NOTICE:
Do not touch the speaker cone.
| (a) Remove the 4 bolts. |
|
| (b) Disconnect the connector. |
|
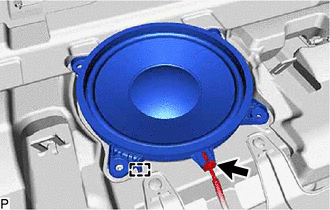
(c) Disengage the guide to remove the rear stereo component speaker assembly.
READ NEXT:
 Inspection
INSPECTION PROCEDURE 1. INSPECT REAR STEREO COMPONENT SPEAKER ASSEMBLY
(a) With the speaker installed, check that there is no looseness or other abnormalities.
(b) Check that there is no foreign m
Installation
INSTALLATION PROCEDURE 1. INSTALL REAR STEREO COMPONENT SPEAKER ASSEMBLY
NOTICE: Do not touch the speaker cone. (a) Connect the connector.
(b) Engage the guide to temporarily install the rear ster
SEE MORE:
Removal
REMOVAL CAUTION / NOTICE / HINT
The necessary procedures (adjustment, calibration, initialization, or registration) that must be performed after parts are removed and installed, or replaced during transmission wire removal/installation are shown below. Necessary Procedures After Parts Removed/Inst
Rough Idling
DESCRIPTION
Problem Symptom Suspected Area
Trouble Area
Engine speed fluctuation due to abnormal combustion
Idle speed too low or high
Strong engine vibration due to above symptoms
Ignition malfunction
Deviation in air fuel ratio (Excessive or i
