Toyota Camry (XV70): Removal
REMOVAL
CAUTION / NOTICE / HINT
NOTICE:
- Immediately after installing the brake pads, the braking performance may be reduced. Always perform a road test in a safe place while paying attention to the surroundings.
- After replacing the rear disc brake pads, always perform a road test to check the braking performance and check for vibrations.
HINT:
- Use the same procedure for the RH side and LH side.
- The following procedure is for the LH side.
PROCEDURE
1. PRECAUTION
Click here
.gif)
2. REMOVE REAR WHEEL
Click here
3. PERFORM REAR BRAKE PAD REPLACEMENT MODE
Click here
4. DRAIN BRAKE FLUID
NOTICE:
If brake fluid leaks onto any painted surface, immediately wash it off.
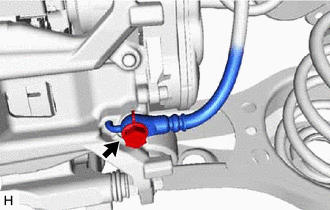
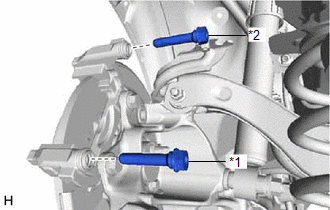
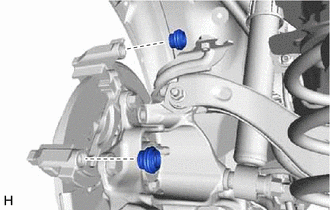
5. SEPARATE REAR FLEXIBLE HOSE
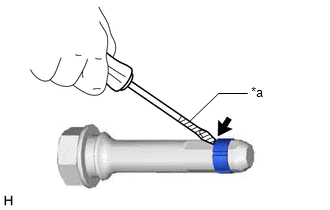
| (a) Remove the union bolt and gasket, and disconnect the rear flexible hose from the rear disc brake cylinder assembly. |
|
6. DISCONNECT NO. 2 PARKING BRAKE WIRE ASSEMBLY
Click here
7. REMOVE PARKING BRAKE ACTUATOR ASSEMBLY
Click here
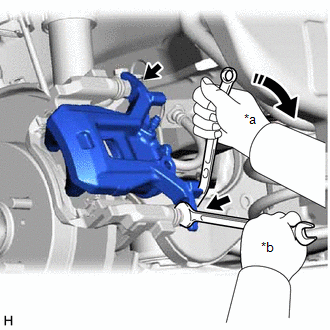
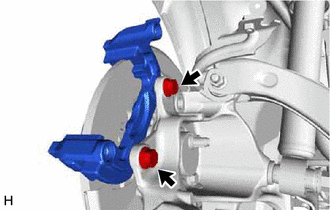
8. REMOVE REAR DISC BRAKE CYLINDER ASSEMBLY
| (a) Hold the 2 rear disc brake cylinder slide pins and remove the 2 bolts and rear disc brake cylinder assembly. |
|
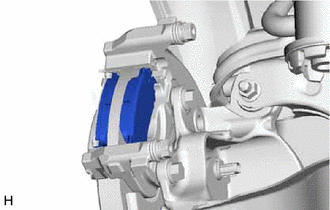
9. REMOVE REAR DISC BRAKE PAD
| (a) Remove the 2 rear disc brake pads from the rear disc brake cylinder mounting. |
|
10. REMOVE REAR DISC BRAKE ANTI-SQUEAL SHIM KIT
Click here
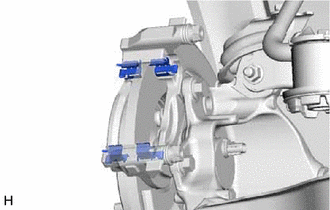
11. REMOVE REAR DISC BRAKE PAD SUPPORT PLATE
| (a) Remove the 4 rear disc brake pad support plates from the rear disc brake cylinder mounting. NOTICE: Each rear disc brake pad support plate has a different shape. Be sure to put an identification mark on each rear disc brake pad support plate so that it can be reinstalled to its original position. |
|
12. REMOVE REAR DISC BRAKE CYLINDER SLIDE PIN
| (a) Remove the rear No. 1 disc brake cylinder slide pin and rear No. 2 disc brake cylinder slide pin from the rear disc brake cylinder mounting. |
|
| (b) Using a screwdriver with its tip wrapped with protective tape, remove the rear disc brake cylinder slide bushing from the rear No. 2 disc brake cylinder slide pin. NOTICE: Do not damage the rear No. 2 disc brake cylinder slide pin. |
|
13. REMOVE REAR DISC BRAKE BUSHING DUST BOOT
| (a) Remove the 2 rear disc brake bushing dust boots from the rear disc brake cylinder mounting. |
|
14. REMOVE REAR DISC BRAKE CYLINDER MOUNTING
| (a) Remove the 2 bolts and rear disc brake cylinder mounting. |
|
15. REMOVE REAR DISC
| (a) Put matchmarks on the rear disc and rear axle hub and bearing assembly. |
|

(b) Remove the rear disc.
READ NEXT:
 Disassembly
DISASSEMBLY CAUTION / NOTICE / HINT
CAUTION: If the rear disc brake cylinder assembly has been disassembled, perform air bleeding for the rear disc brake cylinder assembly.
Click here
NOTICE:
Inspection
INSPECTION PROCEDURE 1. INSPECT BRAKE CYLINDER AND PISTON
(a) Check the rear disc brake cylinder bore and rear disc brake piston for rust and scoring. If necessary, replace the rear disc brake cylin
Reassembly
REASSEMBLY CAUTION / NOTICE / HINT
CAUTION: If the rear disc brake cylinder assembly has been disassembled, perform air bleeding for the rear disc brake cylinder assembly.
Click here
NOTICE:
SEE MORE:
Disassembly
DISASSEMBLY CAUTION / NOTICE / HINT
NOTICE: Before installation of each part, thoroughly clean and dry it. Then apply gear oil to it. Do not use alkaline chemicals to clean aluminum parts, rubber parts or ring gear set bolts. Also, do not use non-residue solvent or other cleaning oils to clean O-r
Pressure Control Solenoid "D" Circuit Short to Battery (P271312)
DESCRIPTION Refer to DTC P27137F. Click here
DTC No. Detection Item
DTC Detection Condition Trouble Area
MIL Memory
Note P271312
Pressure Control Solenoid "D" Circuit Short to Battery
While the engine is running, a short to +B is detected in the soleno
